
In an age where online reviews can make or break a business, Facebook has become a popular platform for customers to share their experiences. Leaving a review should be a straightforward process, right? You write your thoughts, click ‘post,’ and voila! Your review is visible to the world. Or is it?
Something interesting and equally annoying came to my attention recently. I left a review on a Facebook page, thinking I had shared my thoughts with the world. However, when I checked on it the next day, it was nowhere to be found. It was as if my review had vanished into thin air. After a little investigation, I discovered the culprit behind this disappearing act: the privacy settings on my personal Facebook account.
You see, my general post settings are set to ‘friends,’ and as it turns out, my review inherited this setting. This meant that only my friends could see what I had written. So, there it was – a review that was meant to be a public declaration of my experience, hidden away from the very eyes it was intended for.
I quickly rectified the situation by clicking on my review and changing the settings to ‘public.’ Lo and behold, my review finally made its grand appearance for all to see. This discovery left me with mixed feelings. On one hand, I understood the importance of data protection and privacy. However, on the other hand, it raised some critical questions about the purpose and effectiveness of online reviews.
It’s essential to consider why reviews matter in the first place. Reviews are a powerful tool for consumers and businesses alike. They provide valuable insights into a company’s products, services, and overall reputation. For consumers, reviews are a source of guidance, helping them make informed decisions. For businesses, reviews offer an opportunity to receive feedback, engage with customers, and showcase their strengths.
However, this only works when reviews are accessible to the public eye. If reviews remain hidden behind restrictive privacy settings, their impact is somewhat diminished. Just as importantly, possibly worryingly so, businesses may miss out on valuable feedback, positive reviews, or the chance to address negative experiences promptly.
If you’re a business owner, it’s crucial to be aware of this potential issue with Facebook reviews. Take a moment to check your page’s reviews. You might be surprised to find that not all the reviews left for your business are visible to the public.
In my recent experience, the Facebook page had 27 reviews, but only 19 were showing. The common denominator among the hidden reviews? They were all set to ‘friends’ or another non-public setting. If your customers are unaware of this, they may be inadvertently limiting the reach and impact of their feedback.
So, what’s the solution? As a business owner, it’s essential to educate your customers about the privacy settings associated with Facebook reviews. Encourage them to make their reviews public, so their opinions can be seen by a broader audience. Additionally, consider regularly checking your page’s reviews to ensure that none are hidden due to privacy settings.
Facebook’s intention with these privacy settings may be to protect user data, but it’s essential to strike a balance between privacy and the utility of online reviews. After all, the purpose of a review is to publicly share your thoughts and experiences. If businesses can’t see these reviews, how can they respond, improve, or manage their online reputation effectively?
In conclusion, Facebook reviews can be a powerful tool for both consumers and businesses, but they may not fully display unless set to public. It’s vital for both parties to be aware of this and take the necessary steps to ensure that reviews are accessible to a broader audience. After all, the more transparent and open the review process, the more valuable it becomes for everyone involved.
All posts by websorceress
Changing your Primary Email Address
Sometimes we need to change an email address for a variety of reasons but it’s important to follow a few steps to ensure you don’t miss anything.
1. Set up a new email address
2. Don’t close the old account. Keep it running for the time being.
3. Email (from the old account) all important contacts to let them know of the new change of email address.
4. Turn on automatic forwarding from the old account to the new.
5. Export your contacts from the old account to the new.
6. Forward or back up any important emails you want to save and transfer to the new.
7. Give it a couple of months to ensure everyone is now using your new address, then you can decide to either close down the old one or leave it dormant.
If leaving dormant, check your provider’s rules regarding inactivity, most will delete the account if left too long so make sure you schedule in a couple of log ins throughout the year to avoid the account being deleted.
Facebook New Pages Experience
The old and easy way of adding an admin to your facebook page (assigning page role) has been replaced with assigning ‘page access’ instead:
Open up the facebook business page
Click Settings (gearwheel left menu) > New Pages experience > Page access
To assign a new admin to your Business Manager account (the overall owner of the meta assets – i.e. pages, commerce, insta etc)
Open up Meta Business Suite:
business.facebook.com > Click Settings (bottom left menu) > People > Click the ‘Add People’ button and enter the persons email address in the box.
Assign the appropriate permissions and facebook will send over an invite to be included.
Update Password on Win10 Mail App (desktop)
If you update/change your domain email password via webmail, it is important you update the password in your win10 mail app asap.
- click the mail icon (blue envelope)
- Click the settings gearwheel > manage accounts > click the email account
- In the pop up window, change the Password in the password field and click save.
If you have outlook on your phone, don’t forget to update that too.
**********
This is enough to update the account. If you need to change the incoming/outgoing server settings,
Follow steps 1-2 as above then choose:
Change Mailbox Sync settings – Options for syncing your content.
Here you can choose how often this email app downloads your mail from the server, how long you want it to go back, you can change your display name and switch the sync settings on or off via the toggle.
Click Advanced mailbox settings – Incoming and Outgoing mail server info to change the server and port settings (warning! only do this if you have been asked to by your service provider)
For secure mail, all 4 checkboxes should be ticked.
Set Up Domain Email in Outlook (pc)
Unfortunately there seems to be a bug with Outlook’s automatic set up wizard which is preventing set up of domain email and throwing up errors. It is better to perform a manual set up as instructed below. Quick set up instructions here or scroll down for step by step screenshots. Remember to have your email address and password ready.
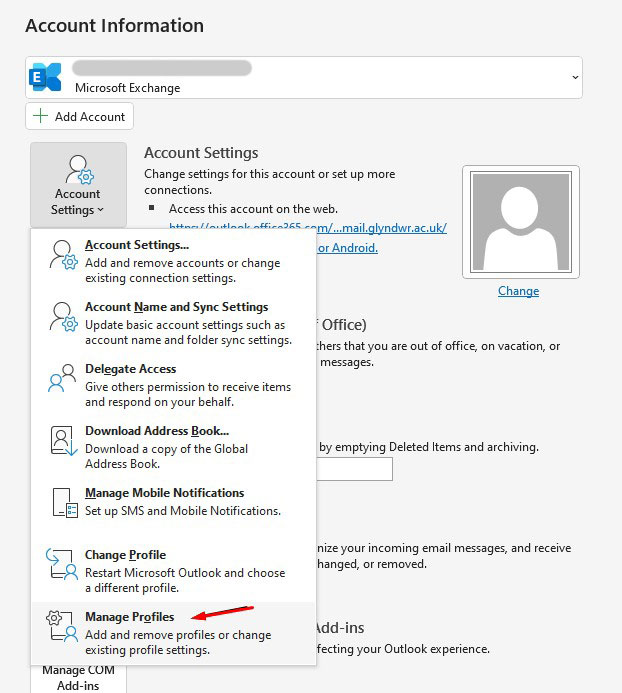
- Open Outlook, Click File > Account Settings > Manage Profiles >Email Accounts >New
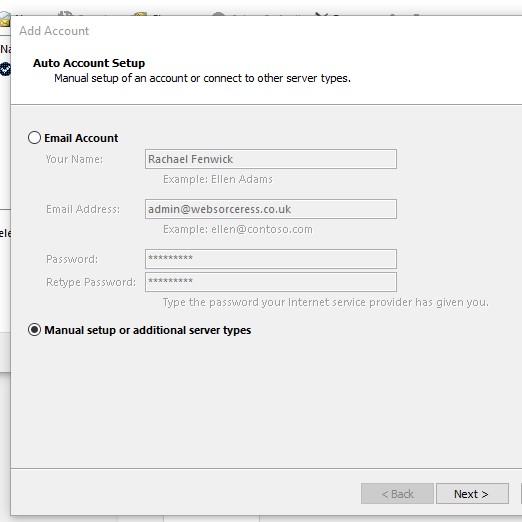
- Enter your name > Email address > Password > Retype Password >Check Manual set up or additional server types > Next
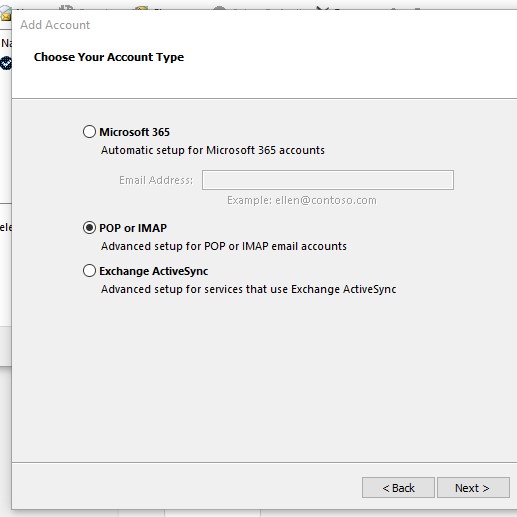
- Choose your account type: pop or IMAP > Next
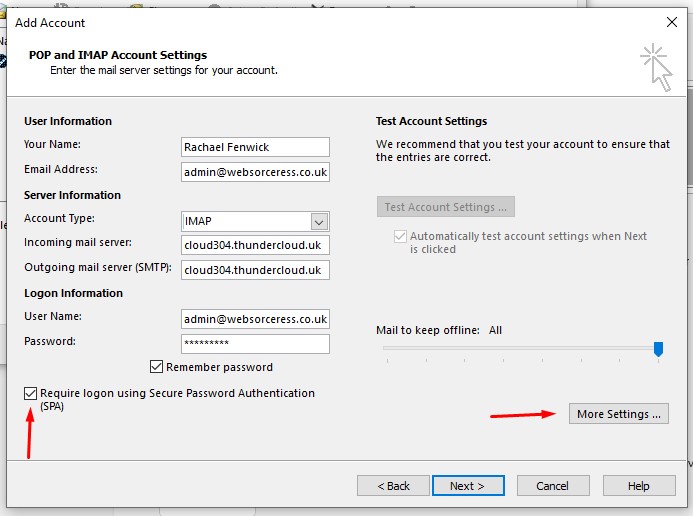
- Fill in all your details, choose IMAP
CHECK the box saying Require logon using Secure Password Authentication
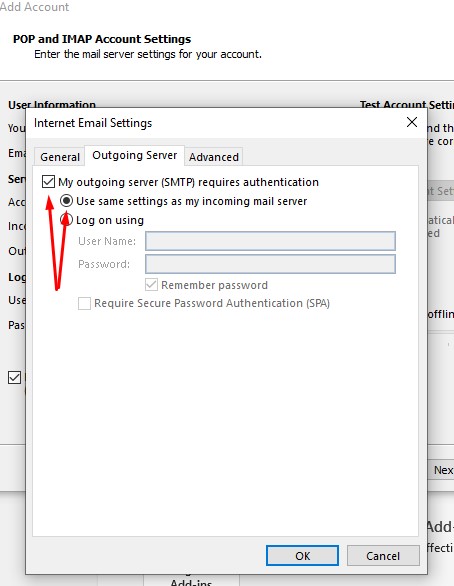
IMPORTANT! before you click next, click More Settings > Outgoing Server >
Check My outgoing server (SMTP requires authentication) AND
Use same settings as my incoming server > OK then click NExt
Outlook will run a test
If successful, close the window
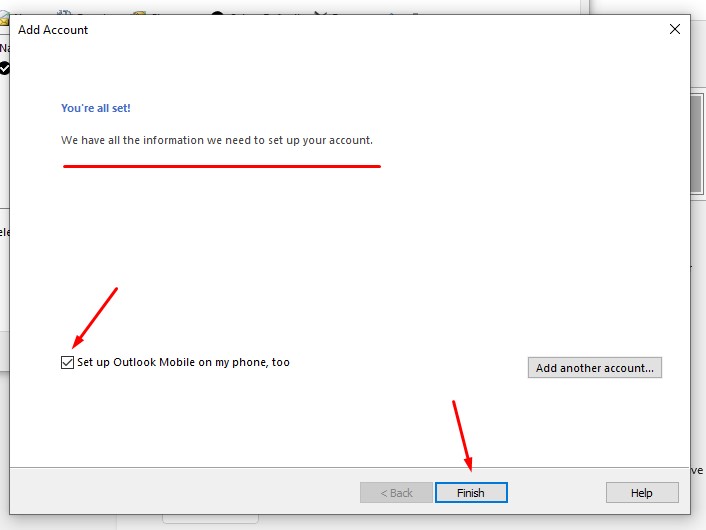
An ‘All set’ window will appear. If you want to set up outlook on your phone too, leave the little checkbox checked, otherwise uncheck it and then click finish.
You will see your new email address added to the email accounts list, close to continue. Return to your home dashboard to manage your new email account.
Step by Step Screenshots:
Click +Add Account > Manage profiles
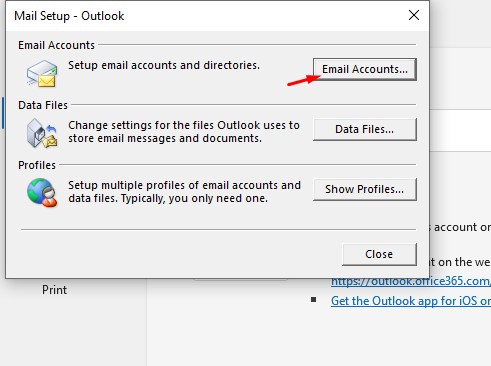
Click Email Accounts
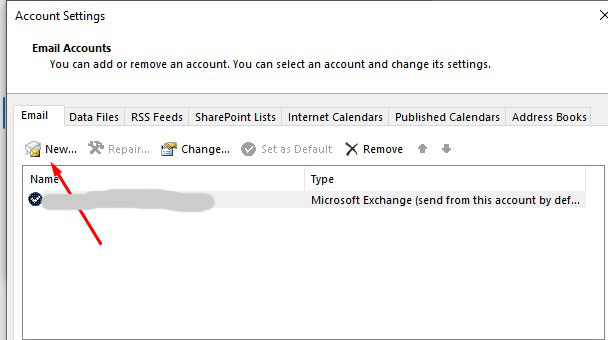
Click New
Enter your details like my example below but using your own email details. Choose manual set up > Next
Choose Pop or IMAP option > Next
Fill in every field in full (using your own name and domain email, server settings are the same).
Important! You must tick the check box at the bottom and click ‘More settings’ before you click next
When the more settings window opens, choose outgoing server and check the two boxes below. These must be enabled ! > OK
Outlook will run a basic test to make sure all is set up. It will then say you’re all set.
If you want to set up outlook on your phone too, leave the little checkbox checked, otherwise uncheck it and then click finish. Then close all the windows and go to your home dashboard to check your emails.
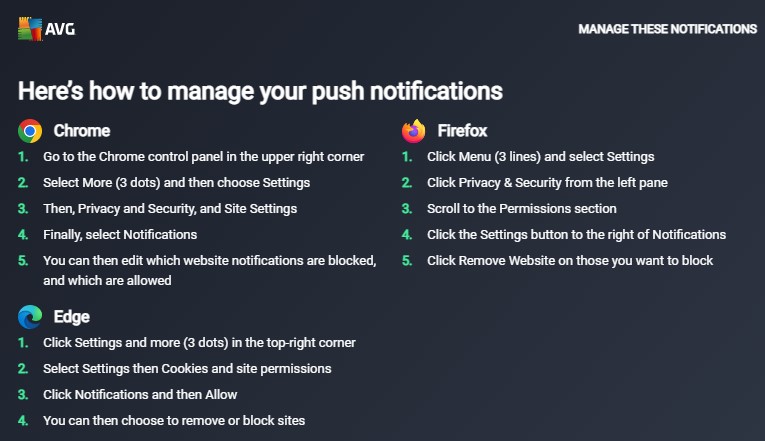
Control Browser Push Notifications
If you’re getting pop up notifications from your browser, you can easily control them, reset permissions or block them entirely.
See the infographic below for instructions with Chrome, Firefox and Edge.
Where’s Page Roles Gone? Admin access on facebook
The new pages experience has changed a lot from the classic and it’s not easy navigating/finding what you need. Facebook has now split the classic experience into several new areas which is a nuisance.
The first annoying thing is page roles has disappeared in favour of a new tab called Page Access. So to manage existing admins/managers or to add new (from desktop)
Open up your facebook business page
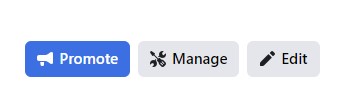
Click the ‘Manage’ tab on the right (under the cover photos)
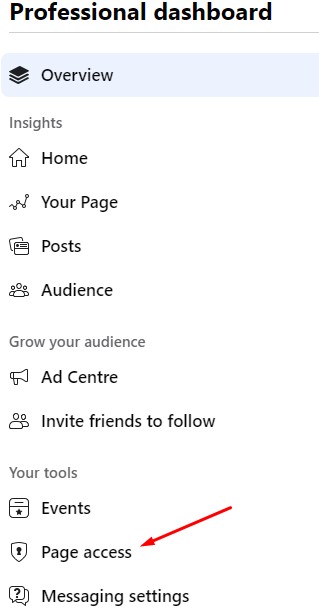
Click ‘Page Access’ from left menu
Here you can manage current admins or click ‘Add New’.
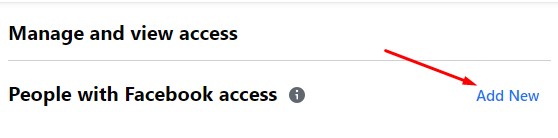
Type in their name, select them and facebook will ask you to enter your own password to confirm.
The person you just added will be sent a notification with a request to manage the page which they must accept to obtain their rights. They have 30 days to do this after which it will be cancelled and you will have to repeat the process.
Online Presence Building – Directories to register your Business with
Once your website is online, listing your business with online directories is the best way to to saturate the search engines with your business details. These local ‘citations’ go along way to letting the search engines and customers know your business is here and here to stay. The key is to keep your information consistent, such as phone numbers opening hours etc. If these are different it causes descrepancies which the search engines don’t like. So make sure your details are up to date and are kept that way.
You may already even be on some of them, if so, check all the data is correct and make sure you have access so you can manage them.
Be prepared for cold calling from these companies once registered as they will do anything to persuade you to take out their premium ‘paid for’ listings. This is of course your choice but the free listings are just fine for the purpose of merely exploiting your business name online. A firm ‘no’ will suffice, there’s no need to engage in any conversation other than that. Sales calls are annoying but I do however feel the advertising and SEO benefits far outweigh this minor inconvenience.
There are in fact many more good business directories/social networking sites to register yourself with than listed here but be careful, always register your business with sites that require a MANUAL registration, don’t be tempted to register yourself with directories that promise automatic listings/submission to 1000’s of search engines. They use tactics against search engine rules and have the potential to do real harm to your web presence. If in doubt, drop me a line.
Google My Business
www.google.co.uk/business – Listing Price: Free
Bing Places
www.bingplaces.com – Listing Price: Free
Yell
www.yell.com – Listing Price: Freemium
Yelp
www.yelp.co.uk – Listing Price: Free
192.com
www.192.com – Listing Price: Free
FreeIndex
www.freeindex.co.uk – Listing Price: Free
Cylex UK
www.cylex-uk.co.uk – Listing Price: Free
UK Small Business Directory
www.uksmallbusinessdirectory.co.uk – Listing Price: Free
Hotfrog
www.hotfrog.co.uk – Listing Price: Free
Bizify
www.bizify.co.uk – Listing Price: Free
Opening Times
www.opening-times.co.uk – Listing Price: Free
Opendi
www.opendi.co.uk – Listing Price: Free
Business Magnet
www.businessmagnet.co.uk – Listing Price: Free
My Local Services
www.mylocalservices.co.uk – Listing Price: Free
County Council Directories – Listing Price: Free
To find your local county council website visit: https://www.gov.uk/find-local-council
Don’t forget social media platforms too. Facebook, Instagram, Twitter, Youtube, Linked in etc…
It is really important to make a note of all business directory listings you sign up to and to keep the information consistent. It’s important you notify all of them if you move address, change your phone number, social media accounts or other contact details. Keeping your details up to date and consistent is essential. Not only does it help with local SEO, but most importantly, it helps potential customers get in touch with you.
facebook Likes v Follows
What’s better, a facebook Like or a Follow? This is a question often asked and here’s a brief understanding of both.
When someone likes a Page, they’re showing support for the Page and want to attach their name to it publicly for others to see. The Page will appear as being liked in the About section of that person’s profile.
Likes
People who like a Page will automatically also follow it and will see updates about it in their news feed (subject to facebook’s algorithms, of course). Once you’ve liked the page, you can also choose how often you’d like to see the updates by tapping on the Following settings – choose from Favourite (seeing new posts higher as a priority), Default, Snooze or Off.
Follow
If a person doesn’t want to acknowledge a page and have it appear in their About section, they can choose to ‘follow’ instead. This means they will receive updates about the page in their feed. You can also choose the frequency of updates shown, as above.
It doesn’t quite end there … You now have the option to Like but NOT follow. You publically acknowledge yourself as supporting the page, but you have no interest on seeing its content in your news feed. You have to manually change the settings for this (as described above).
So why would one choose Liking over following on facebook?
If you’re happy to be seen as a fan of the page and want the world to know, then it would be logical to choose Like.
If you follow a particular political organisation or something personal and don’t want others seeing or if you’re a competitor of a business and want to see what they’re posting without having to frequently and manually visit their page but want to see updates in their feed, you may choose to just ‘Follow’.
The only reason I can think of to why one would Like and NOT follow is to perhaps support a friend or family member’s business in publically acknowledging it but that’s as far as it goes, you really have no interest in it other than that?
Which is best for your business?
The best option would be for your customers/fan base to Like & Follow (the default option).
‘Follow only’ is also good as at least the content you post on your page is likely to be seen by them and you yourself have a true indication of how many people are interested in your page (no matter the reason).
A ‘like and no follow’ is pretty pointless other than a small acknowledgement.
So for a business, a like paired with a follow is the best type of acknowledgement for a Page to have, however in my opinion, engagement is what you should be seeking to achieve, not solely focussing on Likes or Followers. Posting up interesting content that your followers will interact with, either by liking posts, getting involved in discussion or clicking links to buy. You can have thousands of likes but unless someone is reading and interacting with your posts, they aren’t retaining who you are and what you do – the entire reason for your page’s existence.
Custom Folders in Outlook (default mail app on windows 10 / 11)
If you have chosen IMAP, your domain email syncs with the email server (where your email account is hosted). If you want to create and use custom folders to organise your emails in Outlook, you first need to create them in Webmail. Follow these steps below:
Log in to Webmail.
Visit: https://webmail.webmailhost.co.uk
Enter your email address and password to login.
Click settings (left menu) > Folders (second pane) > + Create (icon top right) Your new folder will appear in the centre column. Log out.
Now log back into outlook. Click on your email address (left column) > Click ‘Folders’ and you will see your new folder nestled under the inbox.
To move an email over to your new folder, open up the email, click the 3 dots (very top right), click ‘move’ choose your folder and it will transfer the email to that folder.