The new pages experience has changed a lot from the classic and it’s not easy navigating/finding what you need. Facebook has now split the classic experience into several new areas which is a nuisance.
The first annoying thing is page roles has disappeared in favour of a new tab called Page Access. So to manage existing admins/managers or to add new (from desktop)
Open up your facebook business page
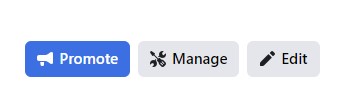
Click the ‘Manage’ tab on the right (under the cover photos)
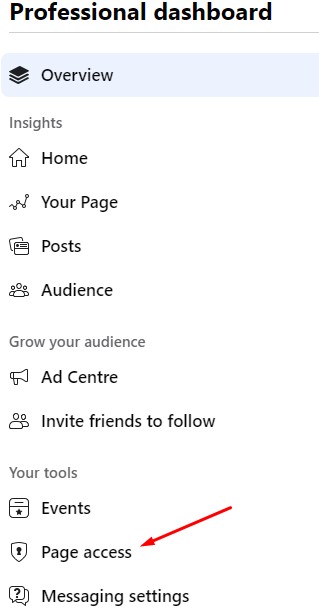
Click ‘Page Access’ from left menu
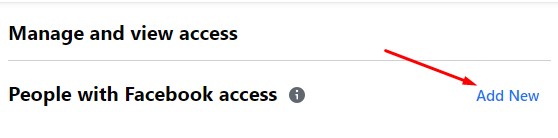
Here you can manage current admins or click ‘Add New’.
Type in their name, select them and facebook will ask you to enter your own password to confirm.
The person you just added will be sent a notification with a request to manage the page which they must accept to obtain their rights. They have 30 days to do this after which it will be cancelled and you will have to repeat the process.
You can add a virtual background to your zoom meeting, with or without a green screen.
Whether you need a green screen or not will depend on whether your pc or laptop supports it.
First you will need to update your Zoom account settings to enable the use of virtual backgrounds:
Log into zoom, go to ‘my account’, ‘Settings’ > Just to the left there will be a heading ‘Meeting’ with options underneath, choose ‘In Meeting (Advanced) > go down to the ‘Virtual Background’ and make sure that toggle to the right is enabled (turns blue)
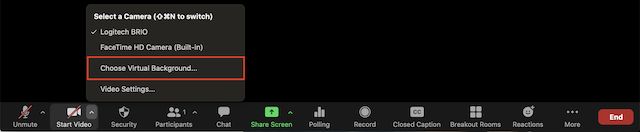
So to enable a virtual background during a Zoom meeting, you need to click the upward arrow (^) next to Start/Stop Video > Click Choose Virtual Background
There are a selection of default ones or you can upload your own. Tip! Don’t wear anything green or you’ll find yourself wearing your background rather than it being behind you!
Want to make your website multilingual, but don’t want to do all the translating manually? Then your best bet is to embed Google Translate directly into your website! Google Translate allows you to instantly translate your website into 60+ languages.
Follow the easy steps below to add the widget to your website.
and sign in to your Google account when you are prompted to.
Step 2
Click on the “Add to your website now” button on the right-hand side.
Step 3
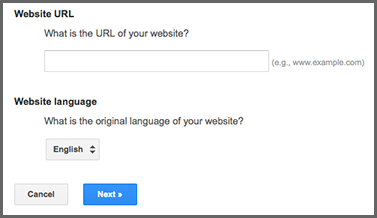
On the next page, you will be required to complete two parts:
Enter the URL (your web address) for your website into the empty “Website URL” field (for example: www.yourwebsite.com).
Choose the original language of your website from the dropdown menu.
Click the Next button.
Step 4
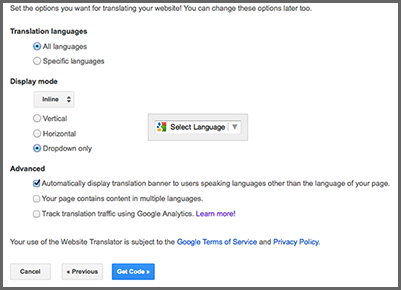
On this page you will choose whether you want to be able to translate into all of the available languages or only the languages that you choose. You will also choose how the translate widget will look on your website, and advanced features.
When you’re done making these choices, click Get Code.
Step 5
On the next page you’ll then see some code that you need to insert onto your website.
Copy this as it needs to be pasted into a new Widget/HTML element.
Either send me the code (if you’re a Websorceress client) or choose where you want the translator dropdown to show up on your website (we suggest adding it to the Sidebar), add a Widget / HTML element to that part of your page, then paste the widget code into the new element.
Step 6
You can manage the translations made on your website, in case you want to ensure that they are done properly and edit them if the translations aren’t quite correct. To do this, click on the Manage Translations button at the end of the embedding process.