Enter your email address in the suggested accounts box and click continue
The IMAP window should open, enter your email password in the box > click the ‘show more’ toggle to open the server settings. Enter your password again in the SMTP server box (the port numbers etc should be fine) Port 993 incoming and 465 for outgoing
Click ‘continue’ button to sync your imap account – it will connect to the server to sync, it may take a few mins, more if you have a lot already in the box, then a success tick will appear when its done and you can click ‘done’.
You will now see your account in outlook down the left side. Send an email to one of your other accounts to check its sending ok, and send it back to make sure its receiving ok. Give emails a few mins to come through.
In the realm of email protocols, POP3 and IMAP each offer distinct advantages and catering to different user needs. While both facilitate the exchange of emails between servers and clients, they operate in different ways, impacting how users access and manage their email accounts.
POP3 (Post Office Protocol 3):
POP3, standing for Post Office Protocol version 3, is one of the oldest email retrieval protocols. It operates by downloading emails from the server to the client device, typically a computer or a mobile device. Once downloaded, the emails are usually deleted from the server, although some configurations allow users to leave copies on the server.
Key characteristics of POP3 include:
Offline Access: POP3 is primarily designed for offline access. Once emails are downloaded onto the client device, users can access them without an internet connection.
Storage Management: Since emails are downloaded and removed from the server by default, POP3 is ideal for users with limited server storage or those who prefer managing their emails locally.
Limited Synchronisation: POP3 lacks synchronisation features, meaning actions taken on one device (such as marking an email as read) may not reflect on other devices accessing the same email account.
IMAP (Internet Message Access Protocol):
On the other hand, IMAP, which stands for Internet Message Access Protocol, offers a more dynamic approach to email management. Unlike POP3, IMAP keeps emails stored on the server and synchronises them with multiple devices.
Key characteristics of IMAP include:
Server-Side Storage: IMAP stores emails on the server, allowing users to access their messages from any device connected to the internet. This ensures consistency across multiple devices.
Real-Time Synchronisation: IMAP synchronises actions performed on emails across all devices in real-time. For example, marking an email as read on one device will immediately reflect on all other devices accessing the same email account.
Flexible Folder Management: IMAP supports the creation of folders and subfolders on the server, enabling users to organise their emails efficiently.
Choosing Between POP3 and IMAP:
The choice between POP3 and IMAP depends on individual preferences and requirements. If offline access and local storage management are priorities, POP3 might be the preferred option. Conversely, for users who value real-time synchronisation across multiple devices and server-based storage, IMAP offers a more suitable solution.
In conclusion, while both POP3 and IMAP serve the fundamental purpose of email retrieval, their operational disparities make them better suited for different user scenarios. Understanding these differences empowers users to select the protocol that aligns best with their needs, ensuring a seamless email experience.
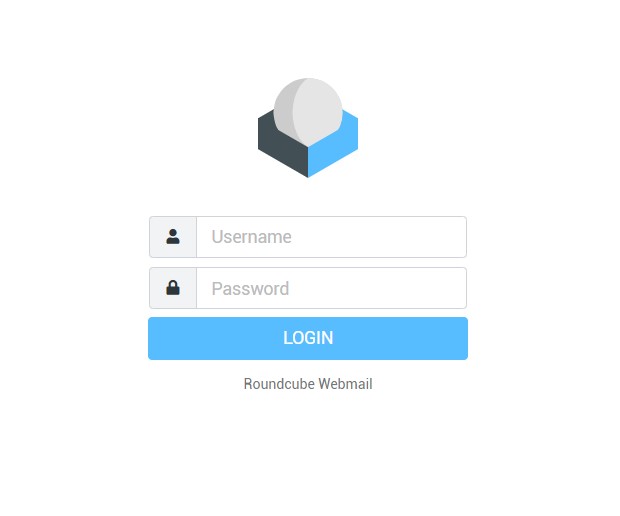
To use Roundcube Webmail through a web browser (such as Google Chrome, Edge, etc.), either click the link below or open a new browser window. Then, type or copy and paste the following into the address bar at the very top (not the search bar in the center):
If you require a password reset, please inform me promptly.
Once logged in you can if you wish change your password, create folders to store your emails, update your address book etc. Always remember to log out after you have finished using it using the red logout link in the bottom left corner.
You have a generous amount of space within your email box (5gb as standard) however, it is a good idea to clear out and delete any old mail, spam periodically to keep the box running efficiently.
(make sure you have your domain email password to hand before you begin – replace yourdomain.co.uk below with your own domain)
From a desktop/laptop… Open up gmail > click settings gearwheel (top right) > ‘See all settings’ > Accounts and Import >
Scroll down to Send Mail as: and click ‘edit info’ next to the email address you need to update. In the pop up window, click ‘Next Step’ change the SMTP server to:
yourdomain.co.uk Port 465 & enable the top radio button (secured connection using SSL) > click ‘Save Changes’ & the window will close.
Now scroll down to the heading:
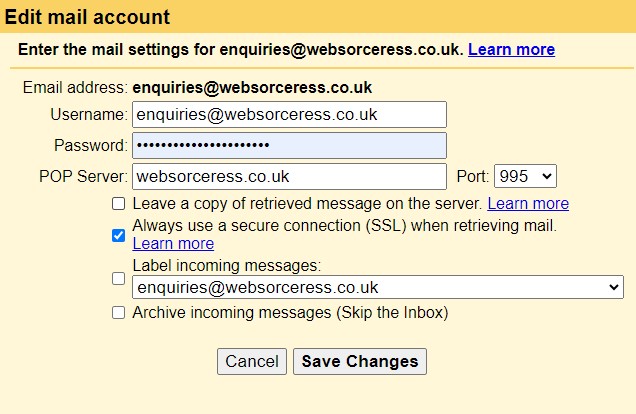
Check mail from other accounts: > click’edit info’ next to the email address you need to update > enter your password > Change POP Server to:
yourdomain.co.uk port 995 & enable the box ‘Always use a secure connection (SSL) when retrieving mail. (you may check the other boxes if you choose – optional) > Click Save Changes. The window will close and your settings are now updated.
Here is an example of my account as an idea of what your screen should look like.
(make sure you have your domain email password to hand before you begin – replace yourdomain.co.uk below with your own domain)
In your mail app, tap the hamburger menu (three horizontal lines) on the left side.
Then tap the settings cogwheel at the top.
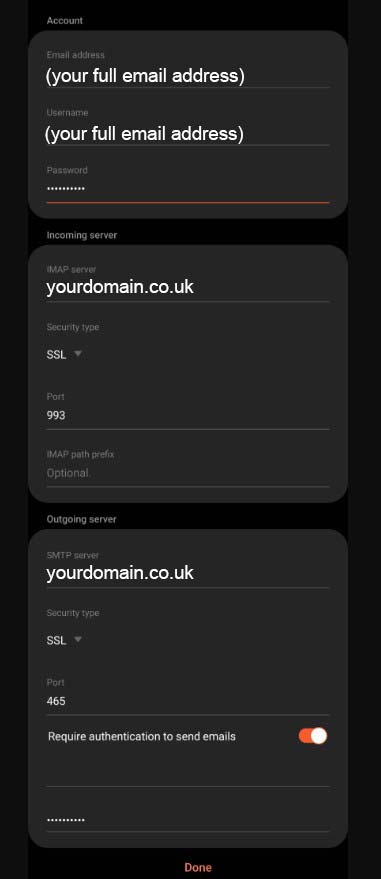
Select the email account you wish to change. Then, scroll to the bottom and tap Server settings. Here is where you can update incoming/outgoing server names, ports, passwords and authentication settings.
Please fill in your password in the fields, even if it looks like its already there or says optional, you must type it in!
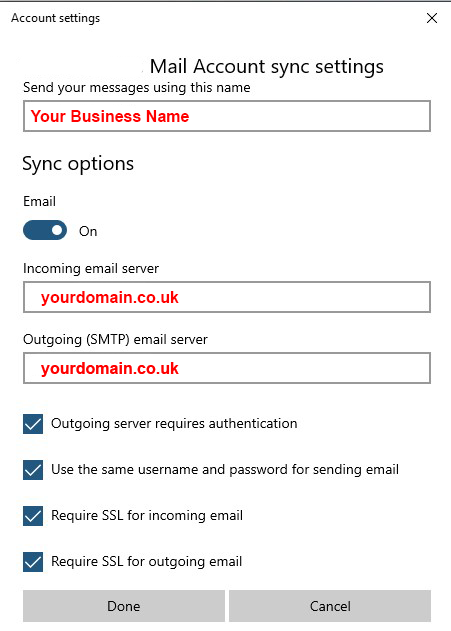
Your screen should look like the image below. Be sure to click Done when finished!
Send a test message out to another one of your non-domain related accounts (such as gmail etc) and send it back again to make sure you are both able to send and receive mail ok.
Having issues?
Our support on issues using this software is limited – we’re happy to verify you’ve put everything in the right place. Please email us with screenshots of the configurations you applied as per this article and we will let you know if anything has been missed.
Our web host has a planned server migration on Wednesday 6th March 2024. It won’t affect your website, however, if you’re still using the cloud304.thundercloud.uk incoming and outgoing mail server settings on your email account, they will need to be updated.
They are being swapped over to cloud327.thundercloud.uk so you can either wait until the day and update the incoming and outgoing mail server settings to this on the 6th March, or you can update them anytime between now and 6th March to:
yourdomain.co.uk
(IMPORTANT: make sure you have your domain email password to hand before you begin – replace yourdomain.co.uk below with your own domain)
1. Open up your mail on windows
2. Click the little blue settings gearwheel cog icon (right bottom menu)
3. Manage accounts (from far top right menu)
4. Tap on your email address i.e. you@yourdomain.co.uk
5. Click ‘Change mailbox sync settings’ – Options for syncing your content
6. Click ‘Advanced mailbox settings’ – incoming and outgoing mail server info
7. Change the incoming mail server to:
yourdomain.co.uk
Change the outgoing email server to:
yourdomain.co.uk
Make sure all 4 boxes underneath are checked blue and click Done, Save. (see screenshot below)
You may now notice there is a triangle warning in the left side of the email address you have just changed. Click on this and enter your email password into the box and click save. This will complete the process. Also, depending on your frequency settings, you may need to allow your box a little time to fully sync.
Make sure it is working by sending an email out to any other email address and when received, send it back again.
You will need to then repeat this process on any other devices and machines you use this email address for. Please make sure it is working fully on each device before attempting to change it on another.
If you have more than one email address, repeat the process.
Sometimes we need to change an email address for a variety of reasons but it’s important to follow a few steps to ensure you don’t miss anything.
1. Set up a new email address 2. Don’t close the old account. Keep it running for the time being.
3. Email (from the old account) all important contacts to let them know of the new change of email address. 4. Turn on automatic forwarding from the old account to the new. 5. Export your contacts from the old account to the new.
6. Forward or back up any important emails you want to save and transfer to the new. 7. Give it a couple of months to ensure everyone is now using your new address, then you can decide to either close down the old one or leave it dormant.
If leaving dormant, check your provider’s rules regarding inactivity, most will delete the account if left too long so make sure you schedule in a couple of log ins throughout the year to avoid the account being deleted.
Unfortunately there seems to be a bug with Outlook’s automatic set up wizard which is preventing set up of domain email and throwing up errors. It is better to perform a manual set up as instructed below. Quick set up instructions here or scroll down for step by step screenshots. Remember to have your email address and password ready.
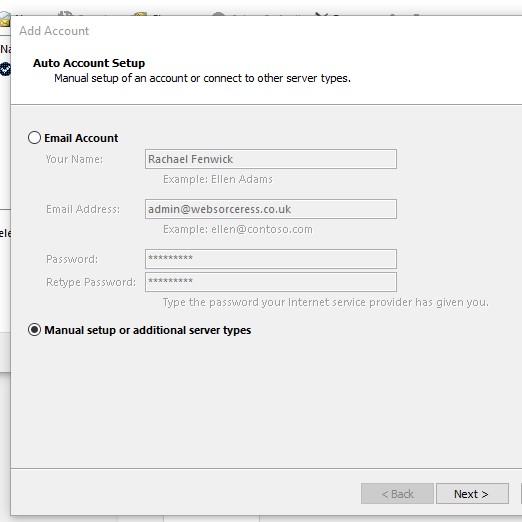
Enter your name > Email address > Password > Retype Password >Check Manual set up or additional server types > Next
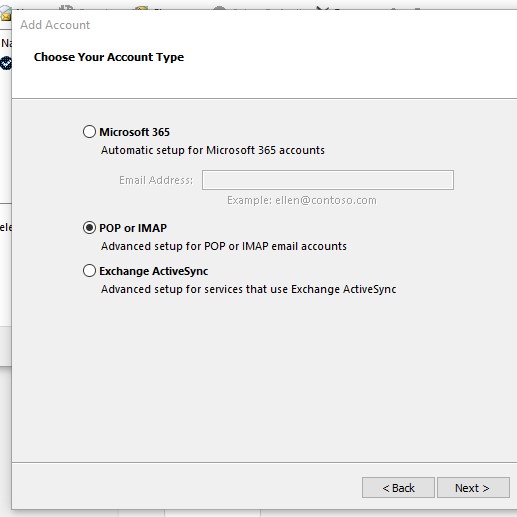
Choose your account type: pop or IMAP > Next
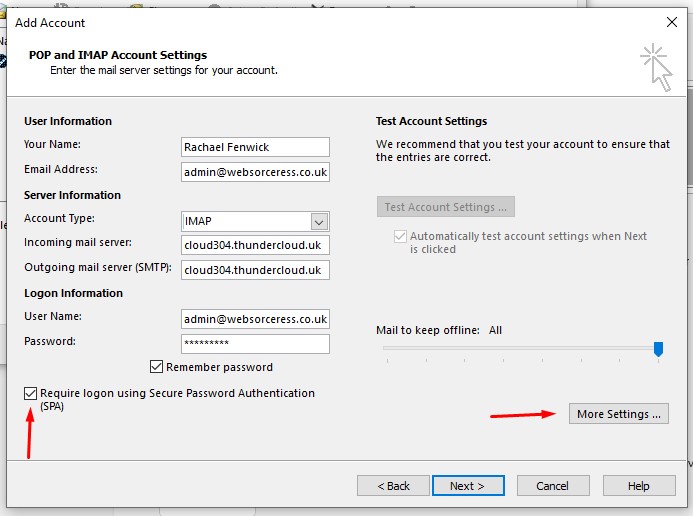
Fill in all your details, choose IMAP
CHECK the box saying Require logon using Secure Password Authentication
IMPORTANT! before you click next, click More Settings > Outgoing Server >
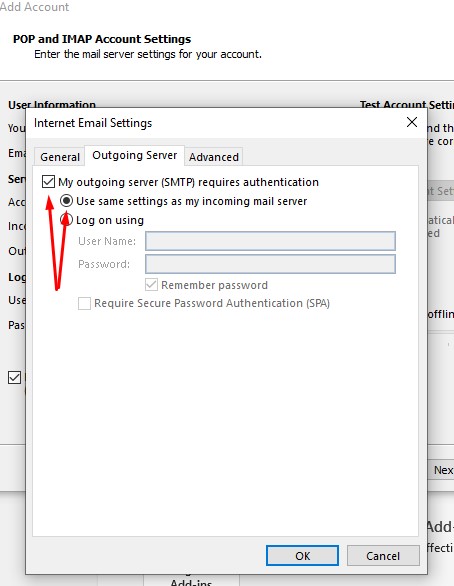
Check My outgoing server (SMTP requires authentication) AND Use same settings as my incoming server > OK then click NExt
Outlook will run a test
If successful, close the window
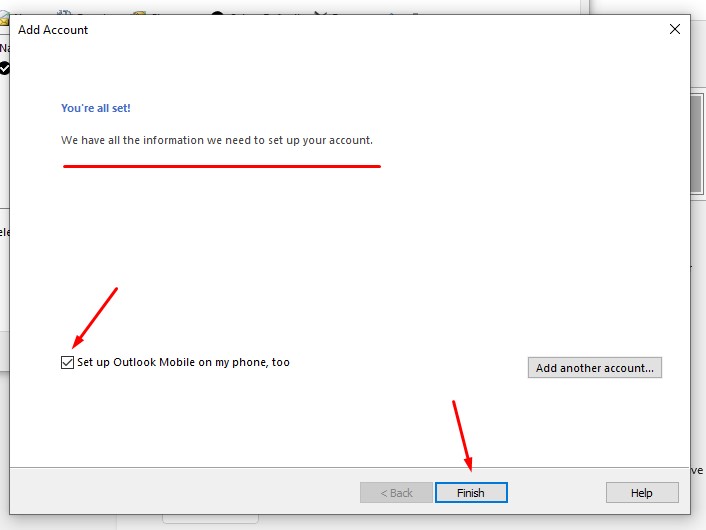
An ‘All set’ window will appear. If you want to set up outlook on your phone too, leave the little checkbox checked, otherwise uncheck it and then click finish.
You will see your new email address added to the email accounts list, close to continue. Return to your home dashboard to manage your new email account.
Step by Step Screenshots:
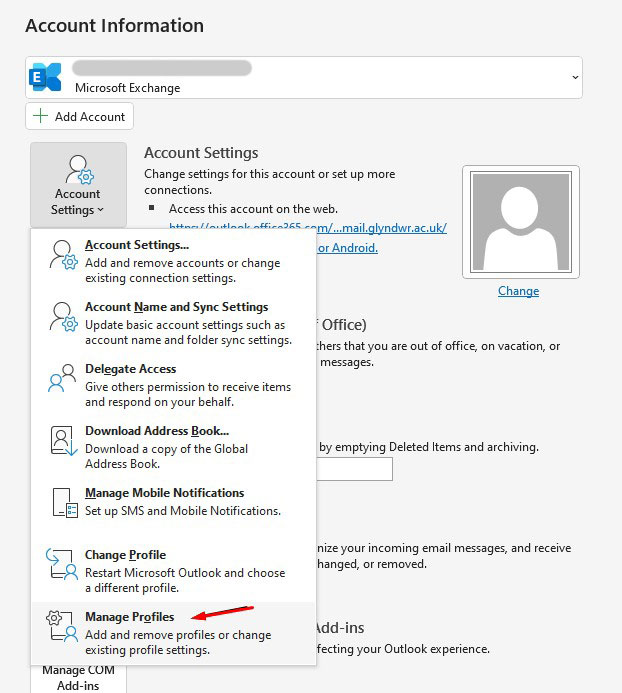
Click +Add Account > Manage profiles
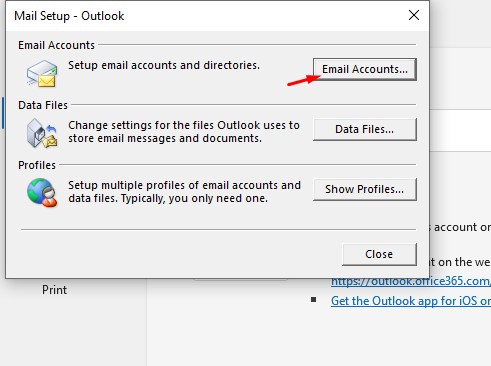
Click Email Accounts
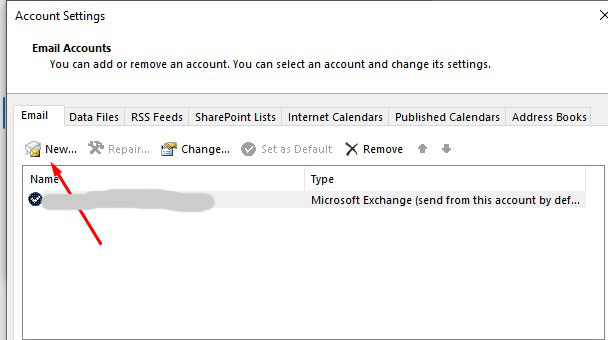
Click New
Enter your details like my example below but using your own email details. Choose manual set up > Next
Choose Pop or IMAP option > Next
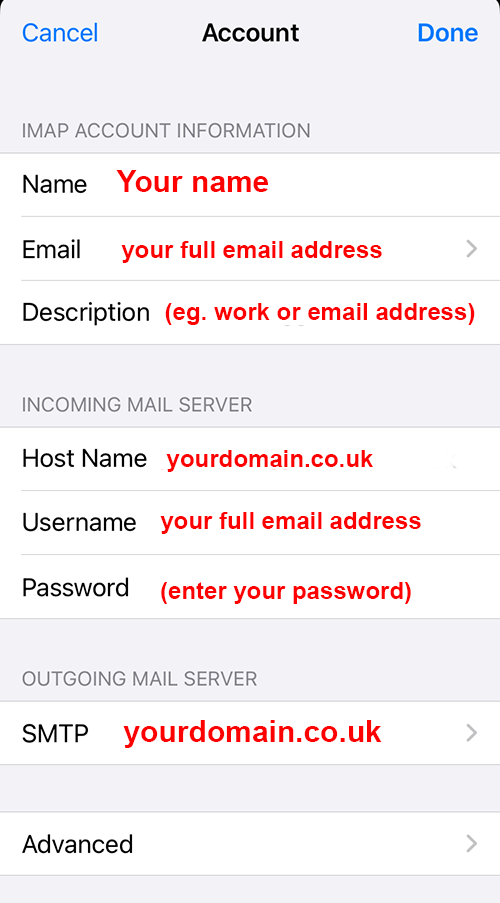
Fill in every field in full (using your own name and domain email, server settings are the same).
Important! You must tick the check box at the bottom and click ‘More settings’ before you click next
When the more settings window opens, choose outgoing server and check the two boxes below. These must be enabled ! > OK
Outlook will run a basic test to make sure all is set up. It will then say you’re all set.
If you want to set up outlook on your phone too, leave the little checkbox checked, otherwise uncheck it and then click finish. Then close all the windows and go to your home dashboard to check your emails.