Can I set up a Business facebook page without a personal profile?

The answer in short is no,  and the reason is because of the way business pages are managed.  A business page requires an ‘admin’ (an official owner) with the choice of adding numerous other persons who can also have a ‘role’ in the management of the page such as an Admin, Moderator, Editor etc.  To cope with the security aspects of this, each assigned role must log into the page via their own personal page.

It should be made clear that when you create a Business Page from your personal account (or are assigned a role) no one can see that you’re the admin or that your personal account is associated with the Page so other than the log in, the two remain separate from each other.  This is particularly necessary to avoid any conflict of interest between the two.

However, if you really don’t want your personal facebook account visible and just want to use it for log in purposes, you can set Facebook’s privacy control to restrict access so only you can see it.  This will prevent you being sent friends requests and other annoying notifications.

To do this, simply set up a blank account using your name and email address.  No need to bother adding a profile picture or anything else – it should literally take a minute or so.

Once facebook has sent you a verification link via email, log in and click the down arrow in the top right, select Settings and Privacy. The section on “Who can see my stuff?” provides options from “Public” to “Friends” to “Only me”. Obviously “Only me” means no one else can then view or find your personal page so set it to this.

In the “Who can look me up?” section, set the email and phone number section to ‘friends’ and check the box at the bottom to disallow search engines outside of facebook to link to your profile.

Your profile is now set up, private from view and you can create your facebook business page.

I’d recommend you download the free facebook pages manager app from Apple Store or Google Play if you need to manage the business page from your phone or tablet as this has all the necessary features required to manage the page quickly and effectively.


Update your Domain Email account settings in Gmail

To update your domain email settings within gmail, you can do this quickly by accessing the settings pages within your gmail account you can find current step by step instructions for your desktop/laptop, android or iphone/ipad by visitng the Gmail help centre here:

https://support.google.com/mail/answer/6562

For SSL customers, you can find step by step instruction from a desktop here: PDF

email Settings for 3rd Party Programs (Outlook etc)

To setup your Email client such as Outlook, Thunderbird and so on you will need the mail settings as below:

For IMAP

Account type: IMAP

Incoming mail server: mail.domain.com (use your own actual domain name)

Port 143

Username: Full email address

Password: mail account password

For SSL use –

Incoming mail server – cloud304.thundercloud.uk

Port :993

For POP3

Incoming mail server: as above

Port 110

User/pass: as above

For SSL use –

Incoming mail server – cloud304.thundercloud.uk

Port :995

Outgoing mail server: as above

Port 25 (you can try port 25025 if you have issues sending)

User/pass: as above

For SSL use –

Outgoing mail server – cloud304.thundercloud.uk

Port :465

Please make sure you enable outbound authentication if using Outlook. This will use the same credentials as your incoming server.

Create an embedded form within Mailchimp

To get an embedded mailchimp sign up form for your website, you need to do the following:

  1. Log into your mailchimp account
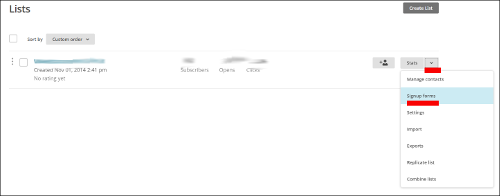
  2. Navigate to the Lists page (top left menu) 
  3. Click the drop down menu of your list and choose ‘Sign up forms’ 
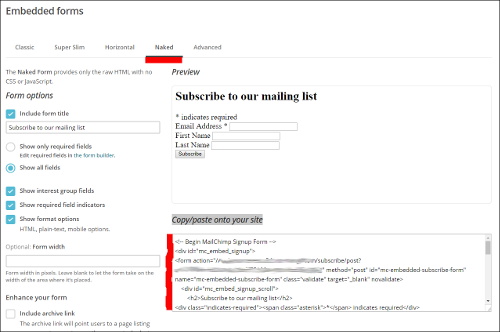
  4. Scroll down to the ‘Embedded Forms’ option and click the ‘select button’ to the right. 
  5. From the options, choose the form type ‘Naked’ (which allows us to style it to match your website) and highlight all the code in the ‘Copy/paste onto your site‘ field, copy it and paste it in an email to us. 

Online Shop Checklist – Good Practice & Information for Legal Compliance

Online Shop owner checklist

1. Contact, trading and pricing details clearly displayed

2. Terms & Conditions

3. ‘Delivery and Returns’ information (in your t’s and c’s, on a special page or both)

4. Register as a controller with the Data Protection Act

5. Have a page especially for ‘Privacy and Cookies’

6. PCI compliance – use a hosted payment gateway

7. Acknowledge orders and send written confirmation (invoice)


Read the full article here: https://help.ekm.com/hc/en-gb/articles/204050425-Getting-your-shop-legit-7-steps-to-trading-online-legally

Read more about legal requirements for your online shop here: https://help.ekm.com/hc/en-gb/articles/204050325-Legal-Requirements-for-eCommerce-Websites

All the info you need regarding the rights as for online sales and the Consumer Rights Directive – covers returns & refunds etc: http://www.ekm.com/blog/consumer-rights-directive-what-does-it-mean-for-you/


Accessing Webmail via your Web Browser

Troubleshooting

2 common mistakes some people make when  trying to access their email via a web browser is:

1: typing in the wrong address and;

2: typing their webmail address into the wrong area.

Firstly, your webmail address is simply:

webmail.yourdomain.co.uk  (replacing yourdomain with your actual domain)

Secondly, you need to type this webmail address into the address line at the very top of your browser as depicted below (NOT in the search area – centre screen):

Browser ScreenshotThen, the Roundcube log in Dashboard will appear and you can log in with your email address and password (looks like this):

Roundcube Log in