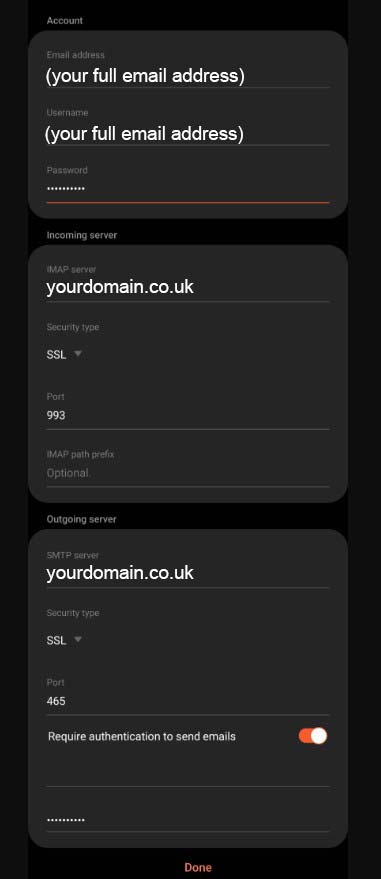
(make sure you have your domain email password to hand before you begin – replace yourdomain.co.uk below with your own domain)
In your mail app, tap the hamburger menu (three horizontal lines) on the left side.
Then tap the settings cogwheel at the top.
Select the email account you wish to change. Then, scroll to the bottom and tap Server settings. Here is where you can update incoming/outgoing server names, ports, passwords and authentication settings.
Please fill in your password in the fields, even if it looks like its already there or says optional, you must type it in!
Your screen should look like the image below. Be sure to click Done when finished!
Send a test message out to another one of your non-domain related accounts (such as gmail etc) and send it back again to make sure you are both able to send and receive mail ok.
Having issues?
Our support on issues using this software is limited – we’re happy to verify you’ve put everything in the right place. Please email us with screenshots of the configurations you applied as per this article and we will let you know if anything has been missed.
Our web host has a planned server migration on Wednesday 6th March 2024. It won’t affect your website, however, if you’re still using the cloud304.thundercloud.uk incoming and outgoing mail server settings on your email account, they will need to be updated.
They are being swapped over to cloud327.thundercloud.uk so you can either wait until the day and update the incoming and outgoing mail server settings to this on the 6th March, or you can update them anytime between now and 6th March to:
yourdomain.co.uk
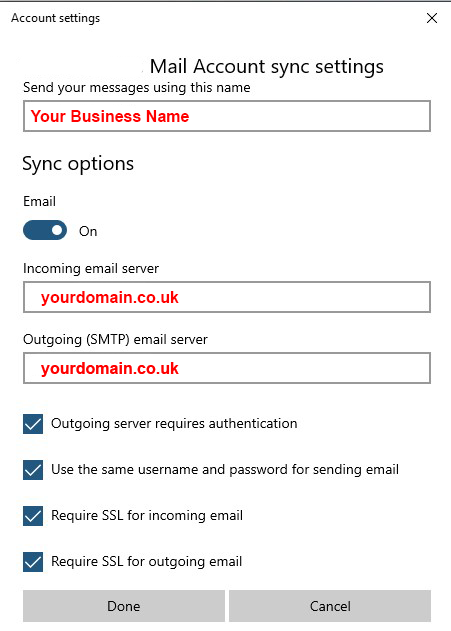
(IMPORTANT: make sure you have your domain email password to hand before you begin – replace yourdomain.co.uk below with your own domain)
1. Open up your mail on windows
2. Click the little blue settings gearwheel cog icon (right bottom menu)
3. Manage accounts (from far top right menu)
4. Tap on your email address i.e. you@yourdomain.co.uk
5. Click ‘Change mailbox sync settings’ – Options for syncing your content
6. Click ‘Advanced mailbox settings’ – incoming and outgoing mail server info
7. Change the incoming mail server to:
yourdomain.co.uk
Change the outgoing email server to:
yourdomain.co.uk
Make sure all 4 boxes underneath are checked blue and click Done, Save. (see screenshot below)
You may now notice there is a triangle warning in the left side of the email address you have just changed. Click on this and enter your email password into the box and click save. This will complete the process. Also, depending on your frequency settings, you may need to allow your box a little time to fully sync.
Make sure it is working by sending an email out to any other email address and when received, send it back again.
You will need to then repeat this process on any other devices and machines you use this email address for. Please make sure it is working fully on each device before attempting to change it on another.
If you have more than one email address, repeat the process.